為何學習 Vue Vue 是三大前端框架(Vue、React、Angular)中學習門檻較低的一個選擇。因此當時我選擇 Vue 為我的首要前端框架。Vue 是一套輕量級、支援雙向數據綁定的框架,同時具備組件化開發、虛擬 DOM 等特點。
在許多 Vue 專案上我們還是有機會看到 Vue2 的身影,所以在深入研究 Vue3 之前,我們先從 Vue2 開始學習。
Vue2 基本架構 首先,我們需要前往 Vue2 的官方網站 https://v2.vuejs.org/ 找到 CDN 引用,然後在我們的工作環境中創建一個資料夾,並使用 VSCode 或您習慣的編輯器開啟。在該資料夾內,我們可以創建一個名為 .html 的文件。
以下是示例的 HTML 文件結構,用於引入 Vue2:
1
2
3
4
5
6
7
8
9
10
11
12
13
14
15
16
17
18
<!DOCTYPE html > <html lang ="zh-Hant-tw" > <head > <meta charset ="UTF-8" /> <meta name ="viewport" content ="width=device-width, initial-scale=1.0" /> <script src ="https://cdn.jsdelivr.net/npm/vue@2.7.14/dist/vue.js" > </script > <title > 創建Vue</title > </head > <body > <div id ="app" > </div > <script > const app = new Vue ({ el : "#app" , data : {}, }); </script > </body > </html >
以上程式碼就能讓我們開始使用 Vue2 了。
簡單的 Vue2 範例 讓我們透過一個簡單的例子來了解 Vue2 的基本用法。data 屬性中定義了兩個資料:msg 和 count。這些數據可以透過雙大括號 {{ }} 進行資料綁定這個方法叫做插值語法,並顯示在 HTML 中,在這個範例的結構中,有一個 div 標籤,其中的 id 屬性被設定為 app,這是通過 el 屬性所實現的,這個 el 屬性的作用是將 Vue 實例與 HTML 中指定的元素進行綁定,這樣 Vue 就會管理這個元素及其內部的數據和行為。
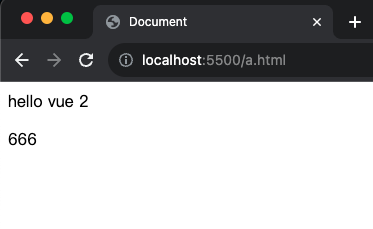
1
2
3
4
5
6
7
8
9
10
11
12
13
14
15
16
17
18
19
20
21
22
23
24
25
<!DOCTYPE html > <html lang ="en" > <head > <meta charset ="UTF-8" /> <meta name ="viewport" content ="width=device-width, initial-scale=1.0" /> <script src ="https://cdn.jsdelivr.net/npm/vue@2.7.14/dist/vue.js" > </script > <title > Document</title > </head > <body > <div id ="app" > {{ msg }} <p > {{ count }}</p > </div > <script > const app = new Vue ({ el : "#app" , data : { msg : "hello vue 2" , count : 666 , }, }); </script > </body > </html >
執行解果:
插值(模板語法 Template Syntax)語法裡也能有運算子 基本規則:
在插值使用的資料必須是有在 data 內的不然會出錯
插值是可以使用表達式(運算式),但不支持陳述式例如:if for 等等
不能在標籤屬性中使用 {{ }} 插值只能在標籤內部使用。
1 2 <p title ="{{使用者名稱}}" > 我是P標籤</p > // 錯誤示範
在插值內可以放入 js 的函式也可以放入表達式以下是個範例:
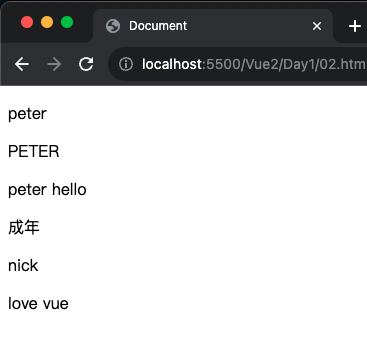
1
2
3
4
5
6
7
8
9
10
11
12
13
14
15
16
17
18
19
20
21
22
23
24
25
26
27
28
29
30
31
32
33
<!DOCTYPE html > <html lang ="en" > <head > <meta charset ="UTF-8" /> <meta name ="viewport" content ="width=device-width, initial-scale=1.0" /> <script src ="https://cdn.jsdelivr.net/npm/vue@2.7.14/dist/vue.js" > </script > <title > Document</title > </head > <body > <div id ="app" > <p > {{ name }}</p > <p > {{ name.toUpperCase() }}</p > <p > {{ name + ' hello' }}</p > <p > {{ age >= 18 ? '成年' : '未成年' }}</p > <p > {{ friend.name }}</p > <p > {{ friend.desc }}</p > </div > <script > const app = new Vue ({ el : "#app" , data : { name : "peter" , age : 18 , friend : { name : "nick" , desc : "love vue" , }, }, }); </script > </body > </html >
執行解果:
Vue 中的常用指令 在 Vue 中,根據不同的用途,指令可以分為以下六大類:
內容渲染指令(v-html、v-text)
條件渲染指令(v-show、v-if、v-else、v-else-if)
事件綁定指令(v-on)
屬性綁定指令(v-bind)
循環渲染指令(v-for)
雙向綁定指令(v-model)
指令是 Vue 開發中最基礎、最常用的知識點。
內容渲染指令 v-html、v-text
v-html:可以在 data 內給入 html tag 在使用 v-html 綁定在元素上,這個方法類似於 js 的 innerHTML。
v-text:可以在 data 內給入文字在使用 v-text 綁定在元素上,這個方法類似於 js 的 innerText。
以下是個範例:
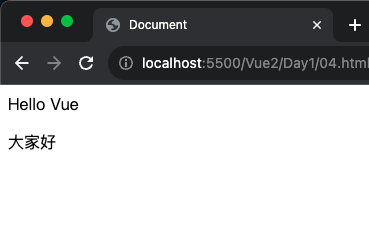
1
2
3
4
5
6
7
8
9
10
11
12
13
14
15
16
17
18
19
20
21
22
23
24
25
<!DOCTYPE html > <html lang ="en" > <head > <meta charset ="UTF-8" /> <meta name ="viewport" content ="width=device-width, initial-scale=1.0" /> <script src ="https://cdn.jsdelivr.net/npm/vue@2.7.14/dist/vue.js" > </script > <title > Document</title > </head > <body > <div id ="app" > <div v-text ="txt" > </div > <div v-html ="p" > </div > </div > <script > const app = new Vue ({ el : "#app" , data : { txt : "Hello Vue" , p : `<p>大家好</p>` , }, }); </script > </body > </html >
執行解果:
條件渲染指令 v-show、v-if、v-else、v-else-if
條件渲染指令用於控制 DOM 顯示或隱藏,有兩種寫法分別是:
v-show:
作用:控制元素顯示或隱藏
語法:v-show=”true 或 false”true 表示顯示,false 則是隱藏
原理:使用 css 來控制顯示隱藏 display:none 或 block,可以打開開發人員工具可以看到如果是 false 元素上會有個行內樣式 display:none;
使用場景:適合用來頻繁切換顯示或隱藏
v-if
作用:控制元素顯示或隱藏或條件渲染
語法:v-if=”true 或 false”true 表示顯示,false 則是隱藏
原理:靠條件判斷來決定是否建立元素或移除元素
使用場景:適合不頻繁切換顯示或隱藏
範例如下:
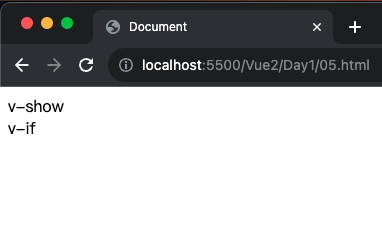
1
2
3
4
5
6
7
8
9
10
11
12
13
14
15
16
17
18
19
20
21
22
23
24
<!DOCTYPE html > <html lang ="en" > <head > <meta charset ="UTF-8" /> <meta name ="viewport" content ="width=device-width, initial-scale=1.0" /> <script src ="https://cdn.jsdelivr.net/npm/vue@2.7.14/dist/vue.js" > </script > <title > Document</title > </head > <body > <div id ="app" > <div v-show ="flag" > v-show</div > <div v-if ="flag" > v-if</div > </div > <script > const app = new Vue ({ el : "#app" , data : { flag : true , }, }); </script > </body > </html >
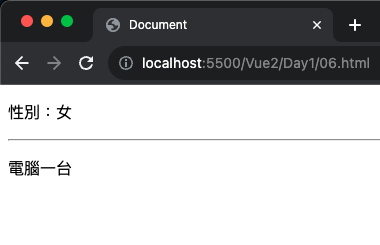
因為現在都是 true 所以都可以被看見
1
2
3
4
5
6
7
8
9
10
11
12
13
14
15
16
17
18
19
20
21
22
23
24
25
26
27
28
29
30
31
32
<!DOCTYPE html > <html lang ="en" > <head > <meta charset ="UTF-8" > <meta name ="viewport" content ="width=device-width, initial-scale=1.0" > <script src ="https://cdn.jsdelivr.net/npm/vue@2.7.14/dist/vue.js" > </script > <title > Document</title > </head > <body > <div id ="app" > <p v-if ="gender === 1" > 性別:男</p > <p v-else > 性別:女</p > <hr > <p v-if ="sorce >= 90" > 電腦一台</pㄒ > <p v-else-if ="sorce >= 70" > 獎金1000</p > <p v-else-if ="sorce >= 60" > 飲料一杯</p > <p v-else > 什麼都沒有</p > </div > <script > const app = new Vue ({ el : '#app' , data : { gender : 2 , sorce : 90 }, }) </script > </body > </html >
執行解果:
事件綁定指令 v-onhttps://v2.vuejs.org/v2/guide/events
1 2 3 4 <button v-on:事件名稱 ="直接將動作放在內例如:count++" > 按鈕</button > <button v-on:事件名稱 ="處理函式" > 按鈕</button > <button v-on:事件名稱 ="處理函式(參數)" > 按鈕</button > v-on: 簡寫為 @
以下兩個範例都可以完成點擊事件 v-on 可以改為@在接上事件名稱:
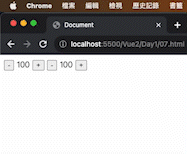
1
2
3
4
5
6
7
8
9
10
11
12
13
14
15
16
17
18
19
20
21
22
23
24
25
26
27
28
<!DOCTYPE html > <html lang ="en" > <head > <meta charset ="UTF-8" /> <meta name ="viewport" content ="width=device-width, initial-scale=1.0" /> <script src ="https://cdn.jsdelivr.net/npm/vue@2.7.14/dist/vue.js" > </script > <title > Document</title > </head > <body > <div id ="app" > <button @click ="count--" > -</button > <span > {{ count }}</span > <button @click ="count++" > +</button > <button v-on:click ="count--" > -</button > <span > {{ count }}</span > <button v-on:click ="count++" > +</button > </div > <script > const app = new Vue ({ el : "#app" , data : { count : 100 , }, }); </script > </body > </html >
執行解果:
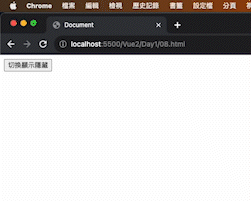
1
2
3
4
5
6
7
8
9
10
11
12
13
14
15
16
17
18
19
20
21
22
23
24
25
26
27
28
29
<!DOCTYPE html > <html lang ="en" > <head > <meta charset ="UTF-8" /> <meta name ="viewport" content ="width=device-width, initial-scale=1.0" /> <script src ="https://cdn.jsdelivr.net/npm/vue@2.7.14/dist/vue.js" > </script > <title > Document</title > </head > <body > <div id ="app" > <button @click ="toggle" > 切換顯示隱藏</button > <h1 v-show ="isShow" > ShouRen</h1 > </div > <script > const app = new Vue ({ el : "#app" , data : { isShow : false , }, methods : { toggle ( this .isShow = !this .isShow ; }, }, }); </script > </body > </html >
methods: 在 Vue 中,methods 就是一些方法,也就是一些你自己定義的程式碼,主要用來執行特定的任務或操作。
this: 把 Vue 想像成一位家長,而每個方法內的「this」,就像是你在家長指導下的手。這個手可以觸摸和處理家裡的不同物品(資料和屬性),同時也能夠進行各種動作(執行方法),這樣你就可以透過這隻手,與家裡的各種事物進行互動。1 2 3 4 5 6 7 8 9 10 11 12 13 14 15 16 17 18 19 20 21 22 23 24 <!DOCTYPE html > <html lang ="en" > </html > <head > <meta charset ="UTF-8" /> <meta name ="viewport" content ="width=device-width, initial-scale=1.0" /> <script src ="https://cdn.jsdelivr.net/npm/vue@2.7.14/dist/vue.js" > </script > <title > Document</title > </head > <body > <div id ="app" > <button @click ="handleClick('Button clicked!')" > 點擊我</button > </div > <script > const app = new Vue ({ el : "#app" , methods : { handleClick (msg ) { console .log (msg); }, }, }); </script > </body > </html >
屬性綁定指令 v-bind
作用:用來動態綁定標籤上的屬性:src url title class href …等等
語法:v-bind:屬性名稱
縮寫:v-bind 可以簡寫成 :
1 2 3 4 5 6 7 8 9 10 11 12 13 14 15 16 17 18 19 20 21 22 23 24 25 <!DOCTYPE html > <html lang ="en" > <head > <meta charset ="UTF-8" /> <meta name ="viewport" content ="width=device-width, initial-scale=1.0" /> <script src ="https://cdn.jsdelivr.net/npm/vue@2.7.14/dist/vue.js" > </script > <title > Document</title > </head > <body > <div id ="app" > <img v-bind:src ="imgurl1" v-bind:title ="msg" alt ="" /> <img :src ="imgurl1" :alt ="imgurl1" /> </div > <script > const app = new Vue ({ el : "#app" , data : { msg : "a picture" , imgurl1 : "https://picsum.photos/id/1/400/300" , }, }); </script > </body > </html >
左邊是用 v-bind 的寫法右邊是縮寫效果都是一樣的執行解果:
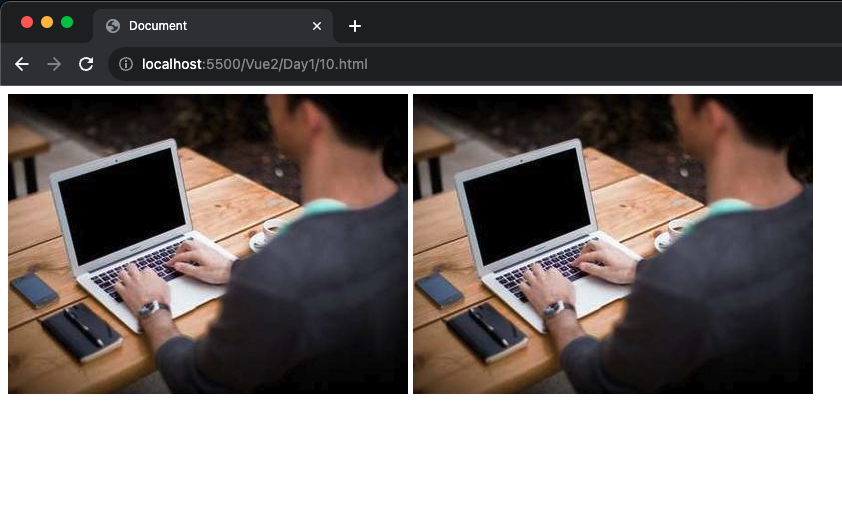
在 data 內放入圖片和索引值:在 data 屬性中定義了一個索引值 index 及一個圖片 URL 的陣列 imgList。
使用 v-bind 將圖片動態綁定:使用 v-bind 指令來將圖片的 src 屬性綁定到 imgList[index],完成動態更換圖片。
點擊上下按鈕切換圖片:使用了 v-show 指令來控制上一頁和下一頁按鈕的顯示和隱藏,根據索引值的範圍來決定按鈕的可見性。並使用 @click(簡寫為 v-on:click)來綁定點擊事件,透過 index 的增減來切換圖片。
1 2 3 4 5 6 7 8 9 10 11 12 13 14 15 16 17 18 19 20 21 22 23 24 25 26 27 28 29 30 31 32 33 34 35 36 <!DOCTYPE html > <html lang ="en" > <head > <meta charset ="UTF-8" /> <meta name ="viewport" content ="width=device-width, initial-scale=1.0" /> <script src ="https://cdn.jsdelivr.net/npm/vue@2.7.14/dist/vue.js" > </script > <title > Document</title > </head > <body > <div id ="app" > <img :src ="imgList[index]" alt ="" /> <div > <button v-show ="index > 0" @click ="index--" > 上一頁</button > <button v-show ="index < imgList.length -1" @click ="index++" > 下一頁 </button > </div > </div > <script > const app = new Vue ({ el : "#app" , data : { index : 0 , imgList : [ "https://picsum.photos/id/1/400/300" , "https://picsum.photos/id/2/400/300" , "https://picsum.photos/id/3/400/300" , "https://picsum.photos/id/4/400/300" , "https://picsum.photos/id/5/400/300" , ], }, }); </script > </body > </html >
執行解果:
循環渲染指令 v-for
1 <div v-for ="(value, key) in array" > {{value}}</div >
value 是迭代過程中每次迭代到 array 的值
key 迭代過程中 array 的鍵
1 2 3 4 5 6 7 8 9 10 11 12 13 14 15 16 17 18 19 20 21 22 23 24 25 <!DOCTYPE html > <html lang ="en" > <head > <meta charset ="UTF-8" /> <meta name ="viewport" content ="width=device-width, initial-scale=1.0" /> <script src ="https://cdn.jsdelivr.net/npm/vue@2.7.14/dist/vue.js" > </script > <title > Document</title > </head > <body > <div id ="app" > <ul > <li v-for ="(value,key) in lists" > {{ value }}--{{key}}</li > </ul > </div > <script > const app = new Vue ({ el : "#app" , data : { lists : ["apple" , "banana" , "guava" ], }, }); </script > </body > </html >
執行解果:
1 2 3 4 5 6 7 8 9 10 11 12 13 14 15 16 17 18 19 20 21 22 23 24 25 26 27 28 29 30 31 32 33 34 35 36 37 38 39 40 41 42 43 44 45 46 47 48 49 <!DOCTYPE html > <html lang ="en" > <head > <meta charset ="UTF-8" /> <meta name ="viewport" content ="width=device-width, initial-scale=1.0" /> <script src ="https://cdn.jsdelivr.net/npm/vue@2.7.14/dist/vue.js" > </script > <title > Document</title > </head > <body > <div id ="app" > <ul > <li v-for ="(list, index) in lists" :key ="list.id" > {{ list.name }}--{{ list.gender }} -- {{ list.id}} <button @click ="remove(index)" > 刪除</button > </li > </ul > </div > <script > const app = new Vue ({ el : "#app" , data : { lists : [ { id : 1 , name : "john" , gender : "boy" }, { id : 2 , name : "emily" , gender : "girl" }, { id : 3 , name : "michael" , gender : "boy" }, { id : 4 , name : "susan" , gender : "girl" }, { id : 5 , name : "david" , gender : "boy" }, ], }, methods : { remove (index ) { this .lists .splice (index, 1 ); }, }, }); </script > </body > </html >
雙向綁定指令 v-model
1 2 3 4 5 6 7 8 9 10 11 12 13 14 15 16 17 18 19 20 21 22 23 24 25 26 27 28 29 30 31 32 33 34 35 36 <!DOCTYPE html > <html lang ="en" > <head > <meta charset ="UTF-8" /> <meta name ="viewport" content ="width=device-width, initial-scale=1.0" /> <script src ="https://cdn.jsdelivr.net/npm/vue@2.7.14/dist/vue.js" > </script > <title > Document</title > </head > <body > <div id ="app" > 帳號:<input type ="text" v-model ="username" /> <br /> 密碼:<input type ="text" v-model ="password" /> <br /> <button @click ="login" > 登入</button > <button @click ="reset" > 重置</button > </div > <script > const app = new Vue ({ el : "#app" , data : { username : "" , password : "" , }, methods : { login ( console .log (this .username , this .password ); }, reset ( this .username = "" ; this .password = "" ; }, }, }); </script > </body > </html >
綜合範例練習 Todo List: 功能:
可以新增項目
可以刪除項目
可以修改項目
可以看到項目的總數
可以清空所有項目
1 2 3 4 5 6 7 8 9 10 11 12 13 14 15 16 17 18 19 20 21 22 23 24 25 26 27 28 29 30 31 32 33 34 35 36 37 38 39 40 41 42 43 44 45 46 47 48 49 50 51 52 53 54 55 56 57 58 59 60 61 62 63 64 65 66 67 68 69 70 71 72 73 74 75 76 77 78 79 80 81 82 <!DOCTYPE html > <html lang ="en" > <head > <meta charset ="UTF-8" /> <meta name ="viewport" content ="width=device-width, initial-scale=1.0" /> <script src ="https://cdn.jsdelivr.net/npm/vue@2.7.14/dist/vue.js" > </script > <title > Document</title > </head > <body > <div id ="app" > <div v-if ="editMode" > <input v-model ="editName" @keyup.enter ="saveEdit" /> <button @click ="saveEdit" > 保存</button > </div > <div v-else > <input @keyup.enter ="add" type ="text" v-model ="todoName" /> <button @click ="add" > 添加</button > </div > <ul > <li v-for ="(list, index) in lists" :key ="list.id" > {{ index + 1 }} -- {{ list.name }} <button @click ="del(index)" > 删除</button > <button @click ="edit(index)" > 編輯</button > </li > </ul > <div v-show ="lists.length > 0" > <p > 所有任務 {{ lists.length }} 項</p > <button @click ="clear()" > 清空所有</button > </div > </div > <script > const app = new Vue ({ el : "#app" , data : { todoName : "" , editName : "" , editIndex : null , editMode : false , lists : [ { id : 1 , name : "睡覺" }, { id : 2 , name : "吃飯" }, { id : 3 , name : "打遊戲" }, ], }, methods : { del (index ) { this .lists .splice (index, 1 ); }, add ( if (this .todoName .trim () === "" ) { alert ("請輸入任務" ); return ; } this .lists .unshift ({ id : +new Date (), name : this .todoName , }); this .todoName = "" ; }, clear ( this .lists = []; }, edit (index ) { this .editIndex = index; this .editMode = true ; this .editName = this .lists [index].name ; }, saveEdit ( if (this .editName .trim () === "" ) { alert ("請輸入任務名稱" ); return ; } this .lists [this .editIndex ].name = this .editName ; this .editMode = false ; this .editName = "" ; }, }, }); </script > </body > </html >