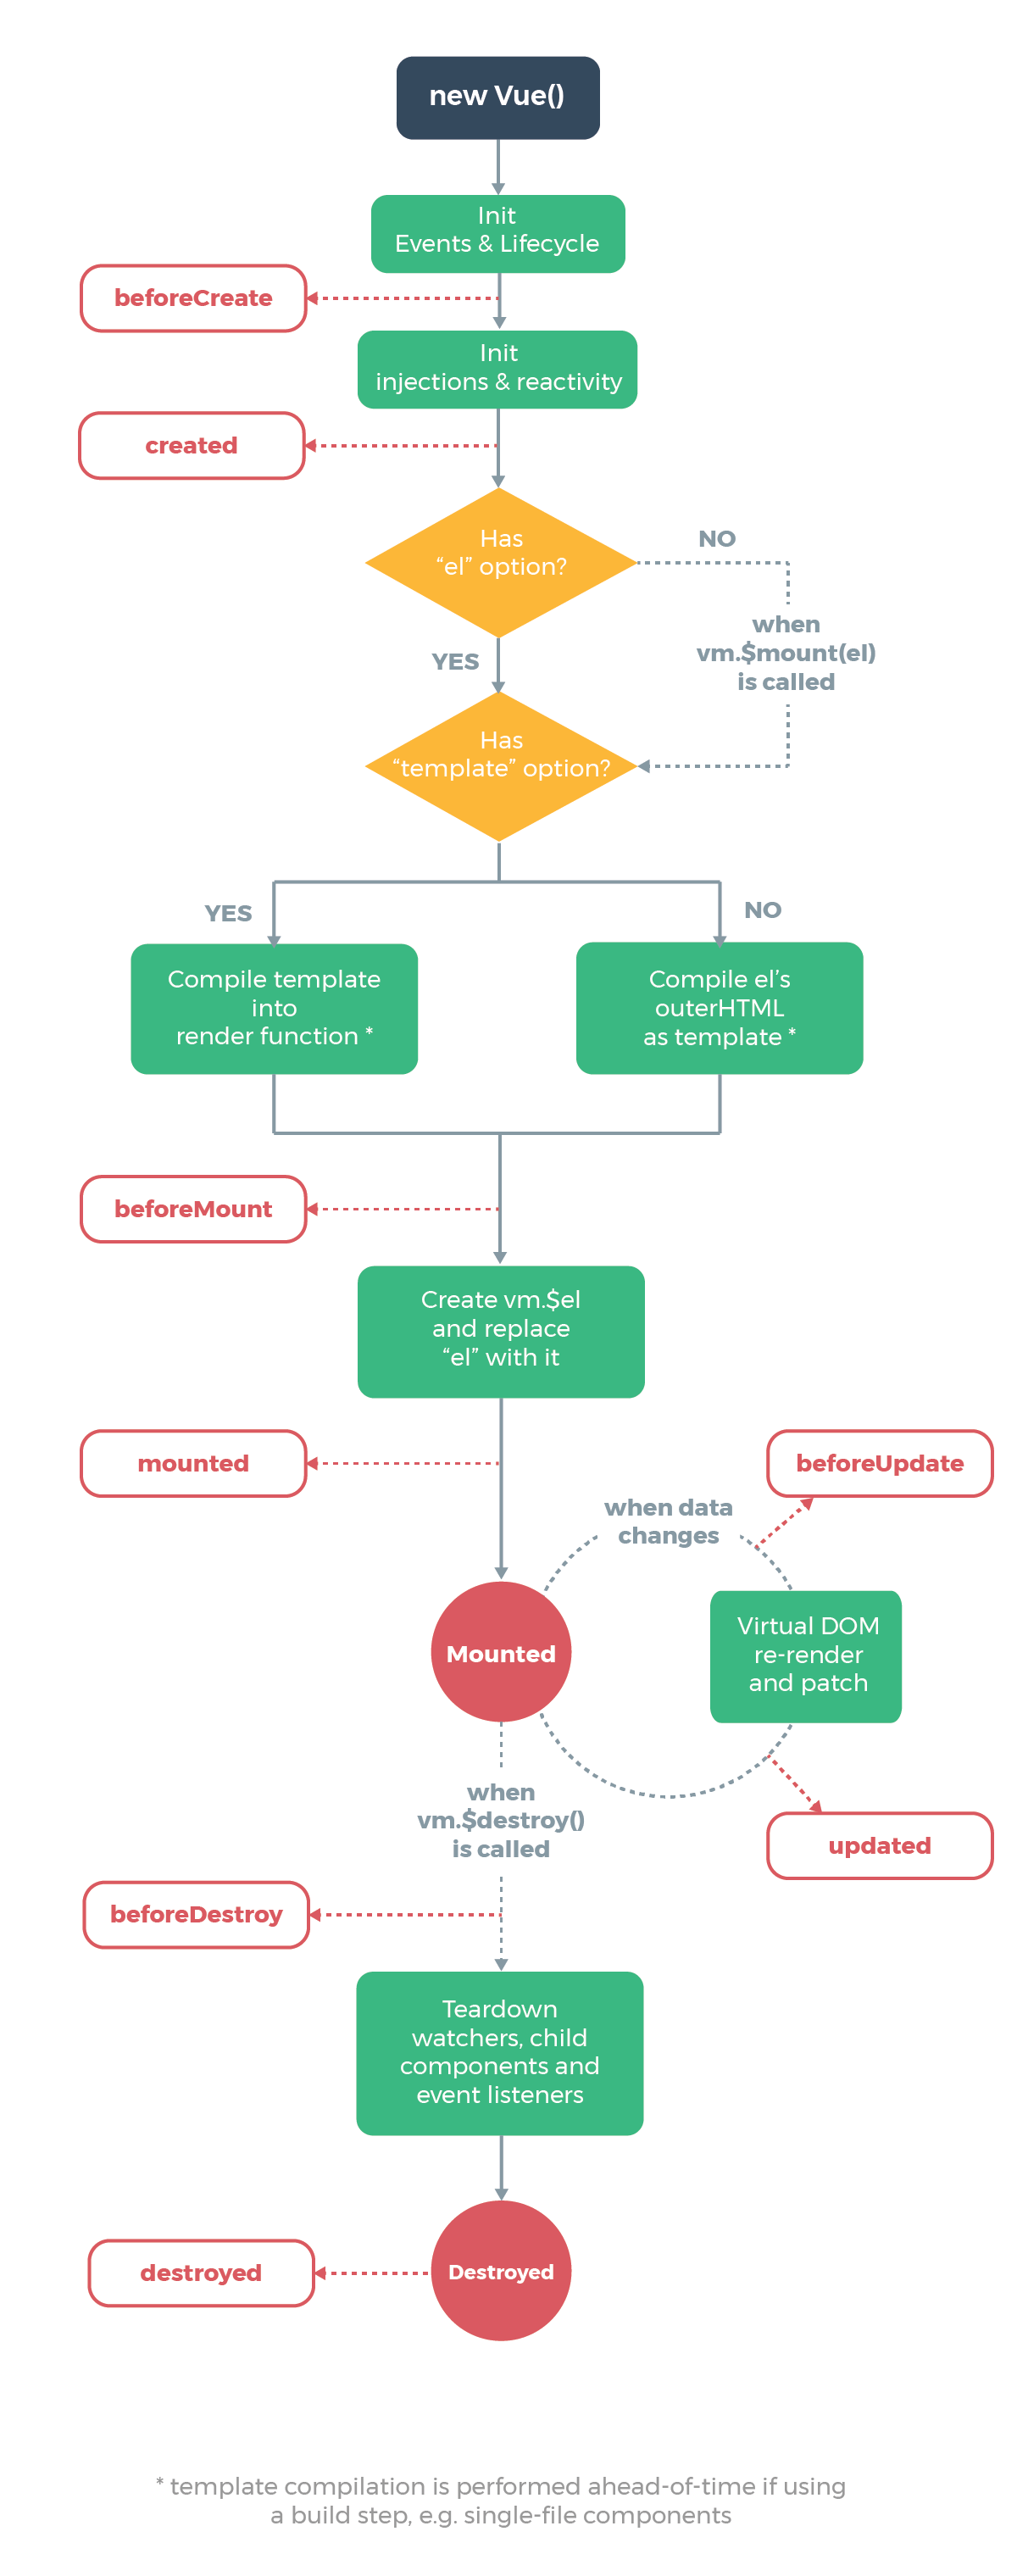
Vue 的生命週期 1.創建階段(Creation):
2.掛載階段(Mounting):
3.更新階段(Updating):
圖解 Vue 的生命週期(圖片取自官網):
以下為生命週期的範例:可以操作一下+ -號在 devtool 觀察 hook 有沒有作用
1
2
3
4
5
6
7
8
9
10
11
12
13
14
15
16
17
18
19
20
21
22
23
24
25
26
27
28
29
30
31
32
33
34
35
36
37
38
39
40
41
42
43
44
45
46
47
48
49
50
51
52
53
54
55
56
57
58
<!DOCTYPE html > <html lang ="zh-Hant-Tw" > <head > <meta charset ="UTF-8" /> <meta name ="viewport" content ="width=device-width, initial-scale=1.0" /> <script src ="https://cdn.jsdelivr.net/npm/vue@2.7.14/dist/vue.js" > </script > <title > Document</title > </head > <body > <div id ="app" > <h3 > {{ title }}</h3 > <div > <button @click ="count--" > -</button > <span > {{ count }}</span > <button @click ="count++" > +</button > </div > </div > <script > const app = new Vue ({ el : "#app" , data : { count : 100 , title : "計數器" , }, beforeCreate ( console .log ("beforeCreate data準備好之前" , this .count ); }, created ( console .log ("create data準備好之後" , this .count ); }, beforeMount ( console .log ( "beforeMount 掛載前" , document .querySelector ("h3" ).innerHTML ); }, mounted ( console .log ("mounted 掛載後" , document .querySelector ("h3" ).innerHTML ); }, beforeUpdate ( console .log ("beforeUpdate" , document .querySelector ("span" ).innerHTML ); }, updated ( console .log ("updated" , document .querySelector ("span" ).innerHTML ); }, beforeDestroy ( console .log ("beforeDestroy" , document .querySelector ("h3" ).innerHTML ); }, destroyed ( console .log ("destroyed" ); }, }); </script > </body > </html >
看完 Vue 中的生命週期我們來實作要如何在 created 時結合 axios 來呼叫 api(使用 fakestoreapi)程式碼如下:
1
2
3
4
5
6
7
8
9
10
11
12
13
14
15
16
17
18
19
20
21
22
23
24
25
26
27
28
29
30
31
32
33
34
35
36
37
38
39
40
41
42
43
44
45
46
47
48
49
50
51
<!DOCTYPE html > <html lang ="en" > <head > <meta charset ="UTF-8" /> <meta http-equiv ="X-UA-Compatible" content ="IE=edge" /> <meta name ="viewport" content ="width=device-width, initial-scale=1.0" /> <title > Document</title > <link rel ="stylesheet" href ="https://cdnjs.cloudflare.com/ajax/libs/bootstrap/5.3.2/css/bootstrap-grid.min.css" /> <style > * { margin : 0 ; padding : 0 ; list-style : none; } img { width : 100% ; } </style > </head > <body > <div class ="container" id ="app" > <ul class ="row" > <li class ="col-lg-3 col-md-6 col-12" v-for ="(item,index) in list" :key ="item.id" > <img :src ="item.image" alt ="" /> <h3 > {{ item.title }}</h3 > </li > </ul > </div > <script src ="https://cdn.jsdelivr.net/npm/vue@2.7.14/dist/vue.js" > </script > <script src ="https://cdn.jsdelivr.net/npm/axios/dist/axios.js" > </script > <script > const app = new Vue ({ el : "#app" , data : { list : [], }, async created ( const res = await axios.get ("https://fakestoreapi.com/products/" ); this .list = res.data ; }, }); </script > </body > </html >
這裡我們在做一個範例使用 mounted 讓 input 自動聚焦
1
2
3
4
5
6
7
8
9
10
11
12
13
14
15
16
17
18
19
20
21
22
23
24
25
26
27
28
29
30
31
32
33
34
35
36
37
38
39
40
41
42
43
44
45
46
47
48
49
50
51
52
53
54
55
56
57
58
59
60
61
62
63
64
65
66
67
68
69
70
71
72
73
74
75
76
77
<!DOCTYPE html > <html lang ="en" > <head > <meta charset ="UTF-8" /> <meta http-equiv ="X-UA-Compatible" content ="IE=edge" /> <meta name ="viewport" content ="width=device-width, initial-scale=1.0" /> <title > Document</title > <style > * { padding : 0 ; margin : 0 ; box-sizing : border-box; } body { background-color : darkslategrey; } .container { position : absolute; top : 50% ; left : 50% ; transform : translate (-50% , -50% ); text-align : center; } .container .box { display : flex; } .container .box input { width : 512px ; height : 2.7em ; padding : 12px 16px ; font-size : 16px ; outline : 0 ; border-radius : 10px 0 0 10px ; border : 2px solid #c4c7ce ; background : #fff ; color : #222 ; overflow : hidden; } .container .box button { outline : 0 ; border : 0 ; cursor : pointer; width : 112px ; height : 44px ; line-height : 2em ; background-color : skyblue; border-radius : 0 10px 10px 0 ; font-size : 18px ; color : white; } </style > </head > <body > <div class ="container" id ="app" > <div class ="container" > <div class ="box" > <input type ="text" v-model ="words" id ="inp" /> <button > 搜尋</button > </div > </div > </div > <script src ="https://cdn.jsdelivr.net/npm/vue@2.7.14/dist/vue.js" > </script > <script > const app = new Vue ({ el : "#app" , data : { words : "" , }, mounted ( document .querySelector ("#inp" ).focus (); }, }); </script > </body > </html >
前端工程化 在開發 Vue 的過程中使用 cdn 是最快最方便的,但隨著專案的複雜度與後續維護方便性我們會使用建構工具來開發,現在主流的建構工具那可能就是 Vite 啦~~個人覺得拉不過我們這裡會先使用 Vue-cli 來操作之後會在更新 Vite 的使用方法
要使用 Vue-cli 要先有 node.js 的環境,而官網建議 node.js 的版本至少要 8.9 或以上版本(建議 v10+)Vue-cli 官網安裝說明
安裝好後可以使用 npm 或是 yarn 來安裝 Vue-cli,我們可以將 npm 想像成一個商店裡面有著很多應用程式
1 npm install -g @vue/cli # OR yarn global add @vue/cli
安裝好後可以使用vue --version指令來確認 Vue-cli 有沒有被安裝成功
在來我們可以使用 vue create 來創建一個 vue 的專案
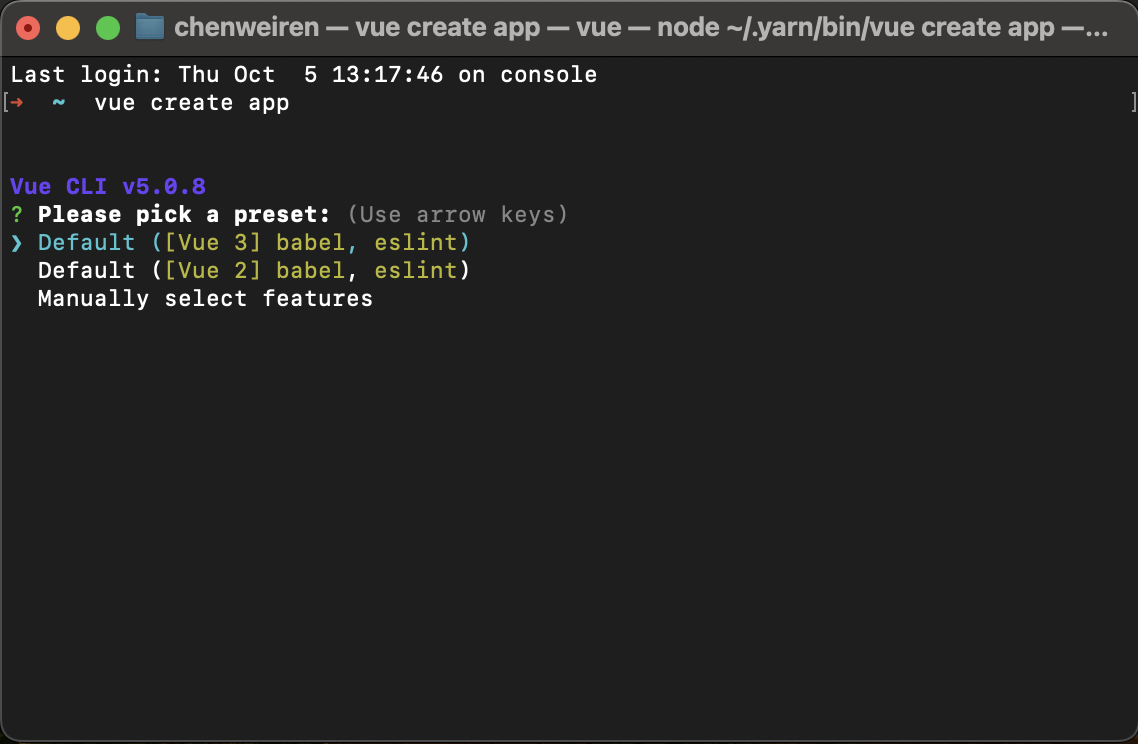
在來就是選擇 vue 的版本跟套件包這裡預設都會有一個 Vue 版本配上 bable 與 eslint 這裡我們都先使用 Vue2 來開發可以使用方向鍵來選取,而 Manually select features 是可以自己配置要有哪些套件
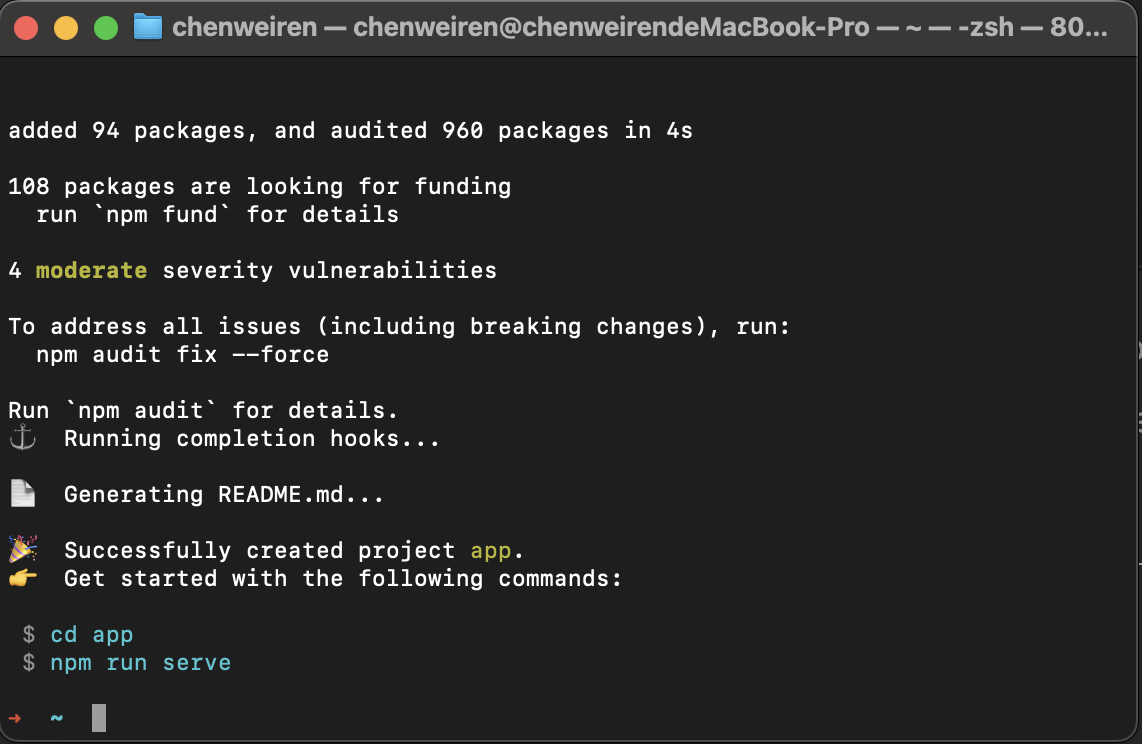
這裡我們創建好專案後可以使用 cd 來切換到專案目錄以這個範例為例就是 cd app 而在圖中可以看到 npm run serve 是在本地開啟一個開發伺服器環境來運行整個專案再來就可以使用編輯器將專案開啟
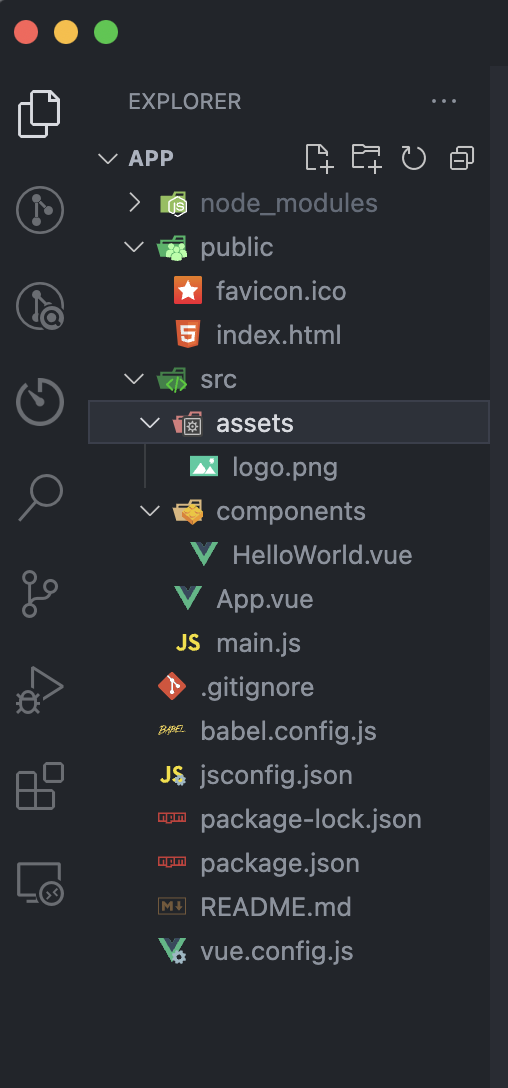
專案架構講解
1
2
3
4
5
"scripts" : { "serve" : "vue-cli-service serve" , "build" : "vue-cli-service build" , "lint" : "vue-cli-service lint" } ,
node_modules 是 Vue 所需的套件 public 內就是我們的 index.html
src 下可以看到有 assets 可以放一些圖片或 CSS
而 components 資料夾放置共用組件
App.vue 是 Vue 應用程式的根節點
 1.這裡我們可以看到 Vue-cli 幫我們建立了許多內容首先我們可以先從 package.json 裡來看有哪些指令可以在專案使用,這裡預設情況下會有剛剛講到的 serve 比較不一樣的是多了一個 build,而 build 是在我們專案寫完後的環境 build 出來的內程式碼都會被壓縮較不容易閱讀